PROGRAMMING THE DEC PDP-1
A QUICK WAY TO GET STARTED
CONTENTS
Overview: the Classical Way
Cross-compiling & PC Data Exchange
Understanding paper tape
Editing your source code: ET
Compiling: MACRO
Debugging: DDT
Tape Tools, Cross-compiler, Disassembler
Overview: the Classical Way
This page only describes the practical steps of working with the programming tools. See the main manual for an introduction to the PDP-1 assembly language itself.
The programming cycle for a PDP-1 assembly programmer would consist of 3 or 4 steps.
- Enter and edit the source code using a text editor, punching a paper tape with the source code when done.
- Compile the source code tape using an assembler, punching a paper tape with the binary code when done.
- Loading the binary code to run it, and see if there are any bugs.
In the old days, the more (in)famous text editor was TECO. Alas, that program has been lost in the mist of time. But before you feel sad, another editor has been preserved: ET, for Expensive Typewriter. It might be good news, because ET is a lot easier to work with. The traditional assembler is MACRO. It has its roots on the PDP-1's predecessor, the TX-0, and was one of the first programs available for the PDP-1. There are other assemblers though. DDT is the traditional debugger. In fact, it was the first debugger ever, and remarkably pleasant to use.
In summary:
ET ---> source paper tape ---> MACRO ---> binary paper tape ---> (optionally in DDT) ---> load binary tape to test your program.
Cross-compiling and data exchange with a PC
When you start programming for the PDP-1, it probably makes sense to first to it 'the classical way', on the PDP-1 itself.However, this is the 21st centure and there are two alternatives:
- Skip ET editing: edit on a PC, generate a source tape for MACRO on the PDP-1
- Skip ET and MACRO altogether: use a cross-compiler on a PC. Just load the RIM tape on the PDP-1
macro1_1is the default cross compilerencode_fiodecis the tool to convert a PC text file into a source code tapedecode_fiodecworks the other way round, converting an alphanumeric (source code) tape back into a PC text filedisassemble_tapedisassembles a binary (compiled) program off paper tape in various formatstape_visualizeris useful to visually inspect a paper tape image file, to make sure it contains what you think it contains
Paper tape image files can have any extension. By convention, .rim identifies a self-loading program tape, .bin is a tape with binary data that may or may not be self-loading, and .pt may be anything. File extensions are not terribly informative, in other words. Use tape_visualizer to see what it contains.
Having knowledge of these tools will make things a lot easier in the following sections.
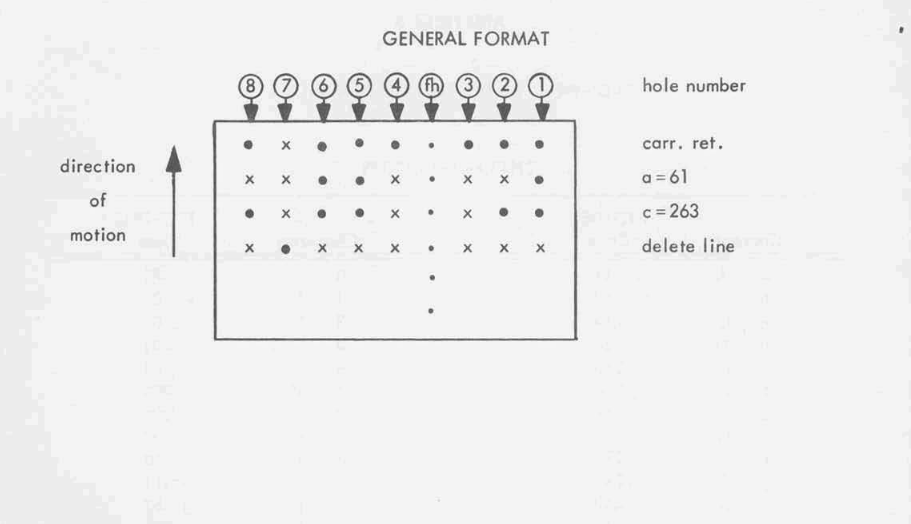
Paper tape: formats for alphanumeric and binary data
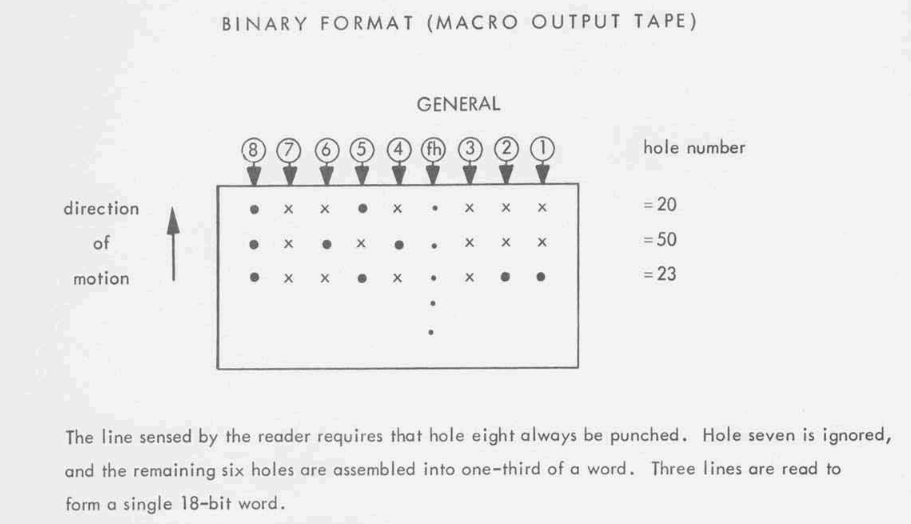
The BIN loader is loaded in at the top of the memory map by the hard-wired circuits behind the 'READ IN' switch. In its details, this is a very neat trick worth studying. After the BIN loader is read, it starts executing to load the rest of the tape. Once it hits the start block, execution is transferred to the actual program.
Note that a binary tape does not have to have the BIN loader. That just makes it read data in more efficiently, if you want to call it that! DDT is often used to read binary tapes without a BIN loader.
Alphanumeric tapes are simpler, of course they might have the human-readable title punched out before the actual file, but there's no BIN loader or start block of course. What there might be (sometimes, must be) is a STOP block at the end of the punched data. Octal code 013, the STOP character, demarks the End-Of-File. Not all alphanumeric tapes have it! It depends on the program that they are intended for. But MACRO certainly wants it.

Editing your source code: ET
For editing,ET is used. Originally, more often an off-line typewriter was used to generate the paper tape. ET was indeed the expensive option as it occupies the computer. But we are used to its creature comforts now. ET is a modal editor: it has a command mode and a text mode, much like VIM today. ET was really short for Expensive Typewriter, but DEC renamed it to 'the PDP-1 Symbolic Tape Editor'. Which sounds more - corporate. Below is the minimal set of instructions to get it running and to let it punch out your program source code:
Mount the tape with et.rim in the paper tape reader,
- Set Sense Switches 2 and 6 (Sense Switch 2 lets ET number your lines when editing; Switch 6 suppressed parity errors)
- Press READ IN
w. You will see one empty line. To start entering text, press a and just type away. Backspace will delete the last character and overtype it. Literally overtype it, on paper the new character just types over the old one. ET works on a typewriter, after all, not a video terminal. But in the text buffer, this will be alright.
Once you are done entering text, hit the Backspace key at the start of a new line. This will bring you in command mode again.
w will print out the text for you to review. If you want to insert a new line: ni will insert a new line before line i. Also, a appends text, to continue writing. <nc will let you replace (change) line n. nd will let you delete line n.
The ET summary (page 1, page 2) and the last pages of the full ET manual (link) will give you all the other options of ET. Be aware - there were many different versions of ET, and not all commands in the manual will work.
Once your text is finished, it is time to save it. Make sure Sense Switch 6 is set, then type
p to punch the tape and s to add the STOP code at the end of the tape. Now, take the tape out of the punch (on the PiDP-1, you'd click the save button if you are using the web interface, xxx if you are using the GUI interface, or just pull out the USB stick from the paper tape reader if you chose that alternative on the Rack).
To reload the text, mount the tape on the paper tape reader.
k to kill (empty) the text buffer. r to read the tape, w to type it all out for review. Now you know your tape is good.
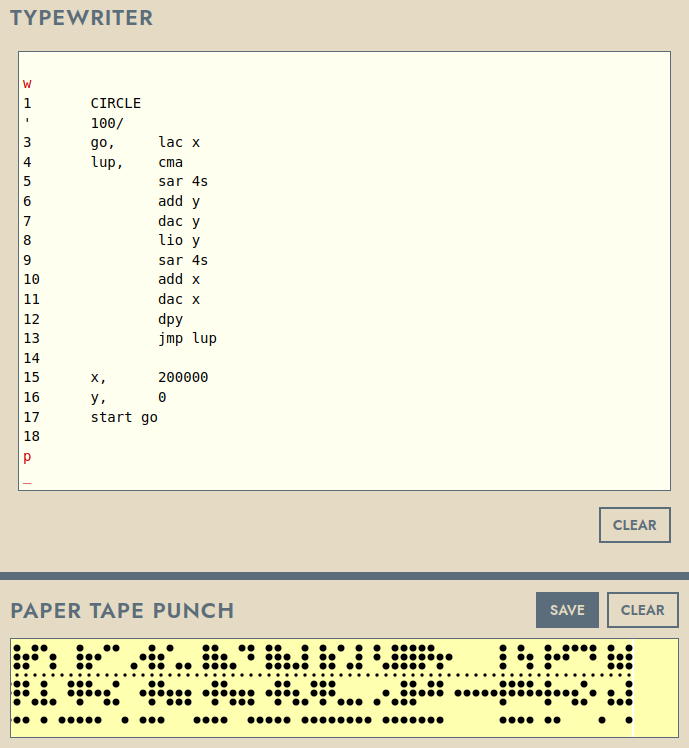
A recommended short program to try things out is CIRCLE. The program below will display a circle on the Type 30 display when compiled and run. In ET, use the TAB key to align the instructions into the second column. So,"go,[tab]lac x[return]lup,[tab]cma[return][tab]sar 4s[return]". Don't forget, [backspace] at a newline will get you out of text mode into command mode again.
We'll go into the MACRO assembler in the next section, but to give you the basics:
The first line is the name of the program. The second line is the start address in memory, where the program will be compiled for and be loaded into.
The program is an endless loop (see the 'jmp lup' that sends the computer back to label 'lup' at the top. x and y are variables, the x and y coordinates on the display.
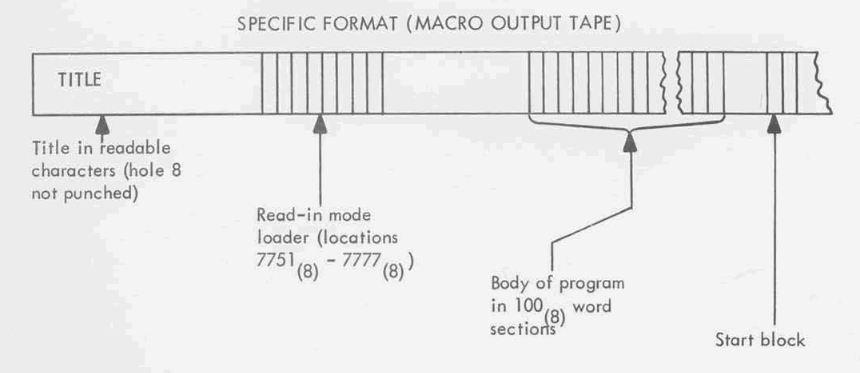
The last line is the start block. Macro will assemble a RIM paper tape by adding the RIM loader at the beginning of the tape, your code will follow and 'start go' is the start block at the end, which will tell the RIM loader where to it can hand over execution once it is done.
CIRCLE
100/
go,     lac x
lup,    cma
        sar 4s
        add y
        dac y
        lio y
        sar 4s
        add x
        dac x
        dpy
        jmp lup

x,      200000
y,      0
start	go
We'll go into the MACRO assembler in the next section, but to give you the basics:
The first line is the name of the program. The second line is the start address in memory, where the program will be compiled for and be loaded into.
The program is an endless loop (see the 'jmp lup' that sends the computer back to label 'lup' at the top. x and y are variables, the x and y coordinates on the display.
The last line is the start block. Macro will assemble a RIM paper tape by adding the RIM loader at the beginning of the tape, your code will follow and 'start go' is the start block at the end, which will tell the RIM loader where to it can hand over execution once it is done.
Are you not surprised we draw a circle without floating point, sine, cosine, and all that? See Integer Circle Algorithm for some democoding ideas!
DEC suggests this as your first step into PDP-1 programming.

Compiling your source code
We will use the venerableMACRO. Make sure all switches (the 18 of the Test Word, the 17 on the Address row above, and also the 6 Sense Switches) are off. They have a meaning to MACRO.
- Mount the tape with macro.rim in the paper tape reader
- Press READ IN
- Mount the tape with your source code in the paper tape reader
- Press CONT. You will see 'Pass 1' appear on the typewriter
- Again mount the tape with your source code in the paper tape reader
- Press CONT. You will see 'Pass 2' appear on the typewriter, and the punch will start to output the binary tape
- Press CONT again. This will punch the start block to the end of the tape
- take the binary tape out of the punch (save it, like you did for the source tape in the previous section)
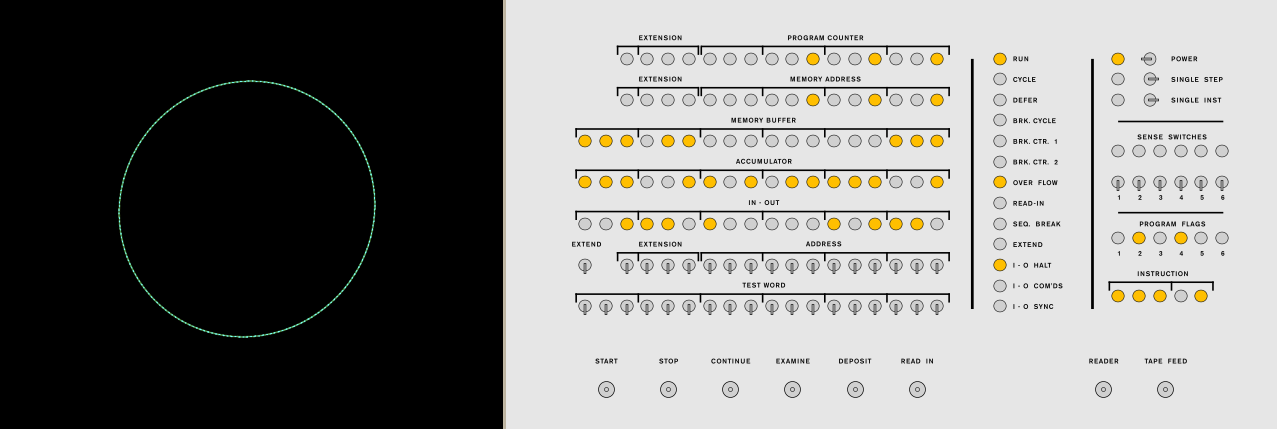
You can mount the just-created tape in the paper tape reader, and press READ IN to run the program straight away. If you did everything right, you will see the Type 30 display the circle.
Alternatively, go to the next section to load the DDT debugger, let it load your program tape, and start debugging!
Alternatively, go to the next section to load the DDT debugger, let it load your program tape, and start debugging!

Debugging your program with DDT
- Mount DDT.rim in the paper tape and press READ IN.
- Mount the paper tape that MACRO just generated for you (or any other small program binary tape of course).
- Type
Zand DDT will clear all memory for you, which helps keep an overview of things - Type
Yand DDT will read in your binary tape - Type
100/to start inspecting your program - it was compiled to start at address 100 and DDT will show you the 'lac 113' instruction - Hit the
Backspacekey to keep reading lines from your program, at address 112 you will encounter the 'jmp' instruction that loops back - Type
100Gto start running the program from address 100, press the front panel STOP switch to stop it again. Now, of course, the whole computer is stopped, so
Set address 6000 on the front panel (switches set to 110 000 000 000), and press theSTARTswitch. The DDT program lives at 6000, so this will bring you back in DDT
Let's print 'helloworld' on the typewriter, by entering this little program:
200/	lac i 212
201/	cli
202/	rcl 77
203/	tyo
204/	sza
205/	jmp 202
206/	idx 212
207/	sas 217
210/	jmp 200
211/	hlt
The exact keystrokes in DDT:
- Type return to start on a new line.
- Type
200/, DDT will add ' 0 ' because that is the current content of address 200. Typelac i 212Backspace' to enter the instruction and go to the next line.
DDT will print '201/ 0 '. Type - Keep going until you have entered 'hlt' on address 211. That was the program itself.
- The first instruction, 'lac i 212' uses address 212 as a variable, so let's initialise that variable at address 212 by setting the value to 0:
Type212/, DDT will respond with ' 0 '. Type0Returnto overwrite the 0 value with - well, a 0 value. This was not strictly necessary. - The string 'Hello' needs to be stored from address 213 onwards. The issue is, of course, the PDP-1 will normally store three 6-bit characters in one 18-bit word of memory. To stash 3 characters in a word:
Type213, DDT responds with ' 0 ' again. Typehel"BackspacelowBackspaceorl"Backspace. The double-quote tells DDT to store the 3 characters as one word in memory. - The problem now is that we only have one character, 'd' left to type. The double-quote trick above only works with 3 letters and will not accept any other characters, like spaces, either.
So the last letter, we enter by its fiodec codes. d is octal 64. Type216/, DDT responds again with ' 0 '. Type640000Return
cli Backspace
That completes your program. You can inspect it by typing
200/ and then go through all the lines using Backspace. Of course, when you arrive at line 212, you do not want that variable disassembled, you want to see the numerical value. That will happen automatically, because the value 213 that is stored in address 212 can't be disassembled into an instruction. Fine, hit Backspace to inspect line 213, which is where the string actually starts.
DDT types '213/ law 6543'. But this is a string, not an instruction to be disassembled. Type ~ and DDT will show you ' hel '. Good, press Backspace and ~ again to go through the rest of the string.
If you have inspected your program and found no typos, you can run it: type
200G. The program will print 'helloworld' and then halt the computer. You can still type on the typewriter, but that is misleading. You are typing to yourself and DDT is not actually running to listen to you! Set the address word on the front panel to 6000, and press the START switch. Now DDT will respond to you again.
If you want to run the program again, you must first reset that variable at address 212 to value 213 again:
212/213 return will do it. Now, perhaps a nice exercise will be to figure out how to make the program print a more modern "Hello, world" instead of a very 1950s 'helloworld'.
The DDT manual (link) is very helpful.
Saving your program:
If you are satisfied with your Hello, world program, note its end address. That was 216 for the original, but maybe you have made the text string longer.
- First, make sure you have initialised the variable in address 212 to value 212!
- Now, clear the punch so there is not remnant of punched data on it
- Give the tape a readable header by typing
LhelloReturn
The Return keystroke tells DDT you want this to be a binary tape with RIM loader, so it 'autoboots' when you will mount and load the tape.
You will see the punch output 'HELLO' and when you've hit return, the code for the RIM loader - Tell DDT to save your program:
200<216D. You will see the output roll out of the punch - Tell DDT to complete the RIM tape with a start block (so after loading, the PDP-1 will know where to start execution):
200J - Save the tape from the punch, clear the punch, and mount the saved tape into the reader. Press the
READ IN switch
Congratulations! You've gone through the entire development cycle on a 1959 DEC PDP-1. It is interesting, worthwhile, rewarding, historically significant. But not completely comfortable from a 21st century perspective. Therefore, the next section will delve into cross-compiling for the PDP-1.
Tape tools, Cross-compiler, Disassembler
Put text on an alphanumerical tape (for MACRO or anything else):
encode_fiodec text-input-file.mac tape-output-file.ptallows you to write programs on any plain-text editor, and convert them to alphanumeric paper tapes for use with MACRO. Of course, this tool can be used to punch any alphanumeric data. You can use it for Lisp and FORTRAN just as well. At least for MACRO, answerywhen asked if you want to add the STOP trailer to the tape. Otherwise, MACRO will not know when to stop reading your source.
Cross-compile straight onto a bootable RIM binary tape:
macro1_1 text-input-filemacwill generate a complete paper tape file with RIM loader for you. Just load the tape into the PDP-1 and it will run.
Disassemble a binary tape:
disassemble binary-tapewill disassemble into various formats. Type 'disassemble_tape' to see its options.
View and inspect what is on a tape:
tape_visualizer paper-tape-file.ptlets you inspect a paper tape image file. The problem with paper tape image files as opposed to physical paper tapes, of course, is that you don't get to see the tape in your hands. This will help solve that problem. It the same time, it will decode the tape for you - if it is an alphanumerical tape, you can read its contents.
 RIM loader binary data is in blue, BIN binary data in red.
The white-inverse labels:
- R marks the RIM 'dio' instruction with the following a a showing the load address. The three tape lines that follow are the instruction that is actually loaded.
- B marks the beginning of a BIN binary block. s s show the start address, e e the end address, and at the end of the block, c c c is the checksum